

Post by JohnG on Aug 27, 2012 12:18:13 GMT
Recording audio.
Naturally to record audio into XGworks it is necessary to set the system up to do that.
Please refer to my XGworks tutorial 1 - setup, paying particular attention to the Audio In connection.
Now we need to decide which track we are going to record the audio onto.
Clearly the file may already have MIDI data within it using up to 16 tracks (or more if have more than one MIDI port available).
We need to choose a currently unused track, no matter if it is already assigned to MIDI, via its entry in the "Type" column, or whether it is currently unassigned.
We need to change its type to "WAVE" by clicking in its entry in the "Type" column and selecting "WAVE".
The following screen snapshot shows track one with the "Type" changed to "WAVE" which will autoselect the device that you chose for audio input.
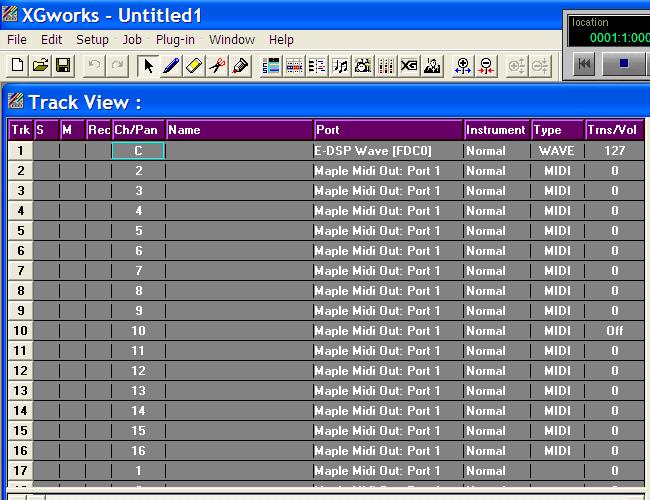
You may then select the pan position for the instrument or vocal by altering the value in the "Ch/Pan" column.
L7 is hard left, R7 hard right and C centred, or some in between value.
Once the track is set up, then make sure you have the appropriate hardware connection(s) ready to record from guitar or microphone, or the audio output of a keyboard, whatever. Also check that you have turned on and turned up the volume controls to an appropriate level to record your input. Often a bit of experimentation is required to get these levels correct.
Next we need to "arm" the track for recording by clicking in the "Rec" column of the selected track (a liitle red "R" light should come on). This step tells XGworks which track we wish to record on.
Finally we need to switch on the Record function in the Play Control box.
We don't necessarily have to start recording our audio from the start of the file, we could want to begin recording some way in. The Location box in the Play Control can be preset to a specific location if you wish.
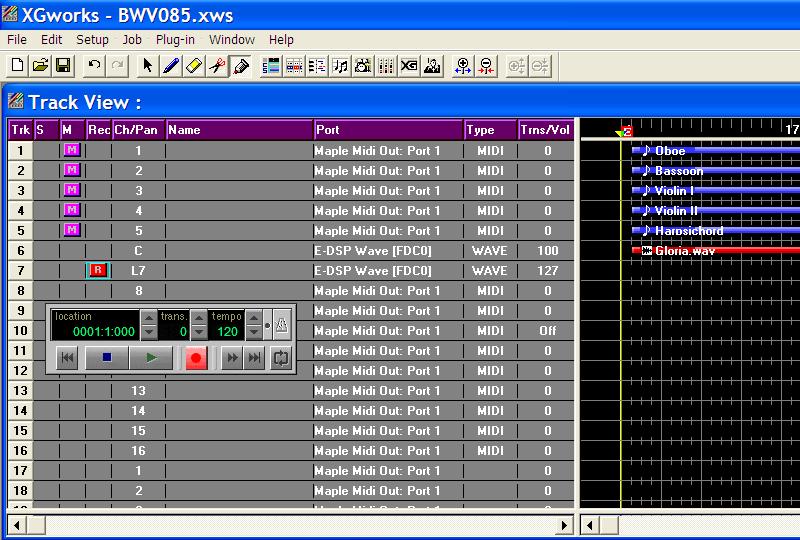
In the example above, we have rendered the first five MIDI tracks to the audio track six and muted the MIDI.
See the "M's" in the Mute column.
The audio will play back through the appropriate connections (possibly headphones) while the vocal is being recorded on track 7. (Make sure the audio being recorded is not fed back into the audio input or feedback will occur.)
Then we click the Play button on the Play Control and, in htis case, simultaneous playback and recording will begin after a brief pause as XGworks creates the file.
An audio file will be created in the directory specified within the Setup Record/Playback settings where it will be given a randomized name. This name can always be changed later.
Hope this proves useful.
JohnG.
Copyright © John L Garside, August 2012.
Naturally to record audio into XGworks it is necessary to set the system up to do that.
Please refer to my XGworks tutorial 1 - setup, paying particular attention to the Audio In connection.
Now we need to decide which track we are going to record the audio onto.
Clearly the file may already have MIDI data within it using up to 16 tracks (or more if have more than one MIDI port available).
We need to choose a currently unused track, no matter if it is already assigned to MIDI, via its entry in the "Type" column, or whether it is currently unassigned.
We need to change its type to "WAVE" by clicking in its entry in the "Type" column and selecting "WAVE".
The following screen snapshot shows track one with the "Type" changed to "WAVE" which will autoselect the device that you chose for audio input.
You may then select the pan position for the instrument or vocal by altering the value in the "Ch/Pan" column.
L7 is hard left, R7 hard right and C centred, or some in between value.
Once the track is set up, then make sure you have the appropriate hardware connection(s) ready to record from guitar or microphone, or the audio output of a keyboard, whatever. Also check that you have turned on and turned up the volume controls to an appropriate level to record your input. Often a bit of experimentation is required to get these levels correct.
Next we need to "arm" the track for recording by clicking in the "Rec" column of the selected track (a liitle red "R" light should come on). This step tells XGworks which track we wish to record on.
Finally we need to switch on the Record function in the Play Control box.
We don't necessarily have to start recording our audio from the start of the file, we could want to begin recording some way in. The Location box in the Play Control can be preset to a specific location if you wish.
In the example above, we have rendered the first five MIDI tracks to the audio track six and muted the MIDI.
See the "M's" in the Mute column.
The audio will play back through the appropriate connections (possibly headphones) while the vocal is being recorded on track 7. (Make sure the audio being recorded is not fed back into the audio input or feedback will occur.)
Then we click the Play button on the Play Control and, in htis case, simultaneous playback and recording will begin after a brief pause as XGworks creates the file.
An audio file will be created in the directory specified within the Setup Record/Playback settings where it will be given a randomized name. This name can always be changed later.
Hope this proves useful.
JohnG.
Copyright © John L Garside, August 2012.