Post by JohnG on Mar 11, 2013 16:15:09 GMT
Creating a MIDI file step by step.
A tutorial for XGworks beginners.
In this lesson I'm going to attempt to show you how to create a very simple MIDI file, from scratch, literally step by step using the XGworks sequencing program, using some clever inbuilt features.
The lesson will be divided into two sections, the first taking a fairly close look at all the things that are suggested should be done in initial file set up, the second looking at the entry of musical notes and then modifying the file to incorporate other MIDI messages, in this case specifically "pitch bend".
In this lesson we will only make use of the computer keyboard and the mouse, as far as note input is concerned. Naturally you will need to have your computer connected up to a suitable sound creation source; a sound card or module, or some kind of virtual instrument, if you want to hear our creation.
The lesson applies to both XGworks version 3 (XGw3) and the English version 4 of XGworks (XGw4) , and I'll try to make clear some of the slight differences between the features as they are implemented in both versions.
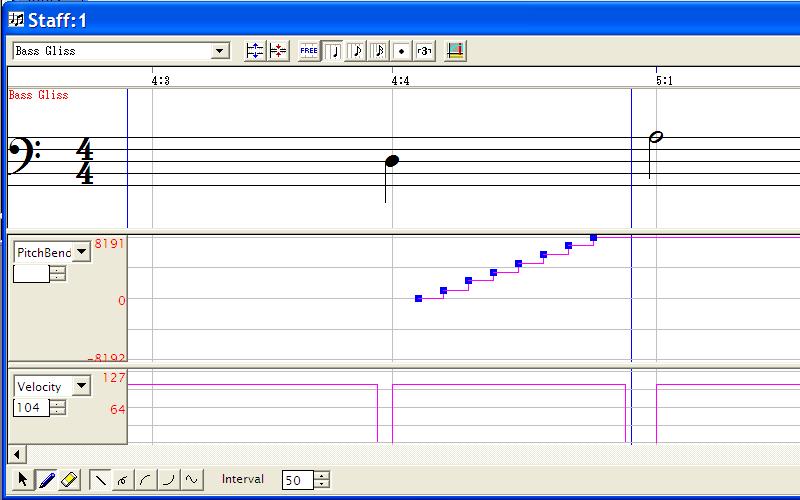
The tutorial was provoked (inspired?) by a question asked by a very experienced sequencer of good quality MIDI files, Wayne (Reed) Knazek, in the MidKar forum over in Yahoo Groups. tech.groups.yahoo.com/group/midkar/message/30496. Wayne wasn't sure how to sequence the opening bass notes for the Byrds version of Mr Tambourine man. Or, rather, specifically the slide from D to A in measures 3 and 4 of the song (repeated in the fade out at the end). Try here: www.youtube.com/watch?v=06rGW0AQGiY
This tutorial will just cover those opening, half dozen or so, bass notes and the pitch bend, but with many XGworks set up and sequencing lessons learned on the way.
Starting Out.
Start up XGworks and make sure you have done the System Setup as outlined in my previous tutorial on this subject. If you're using XGw4 then it will have created a new file with blank "blocks" in measure one, in all of the first sixteen tracks from channels one to sixteen (does that make sense?). Anyway, like this:
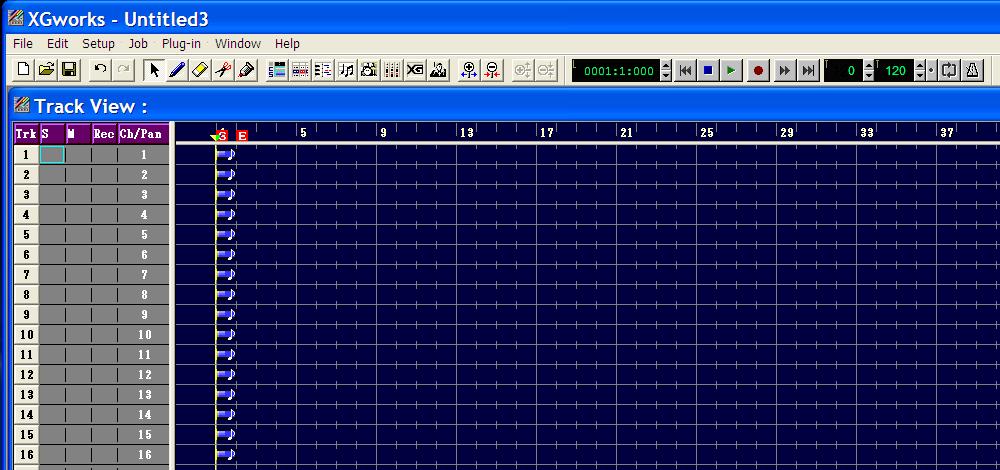
It will also automatically open a List View window initially, which you can close.
We only need track one for this tutorial so, if you like, you can delete the blank blocks in tracks 2 to 16 by highlighting them with the mouse, then pressing the "Delete" key on the keyboard.
For those working with XGw3 we will need to create a blank block in track 1. We do this by picking up the "Pencil Tool" and drawing in the block. The Pencil Tool can be found on the Tool Bar at the top, next to the Arrow Tool. Alternately and more easily, right click anywhere within the Track View and select the Pencil from the pop-up menu. See below:
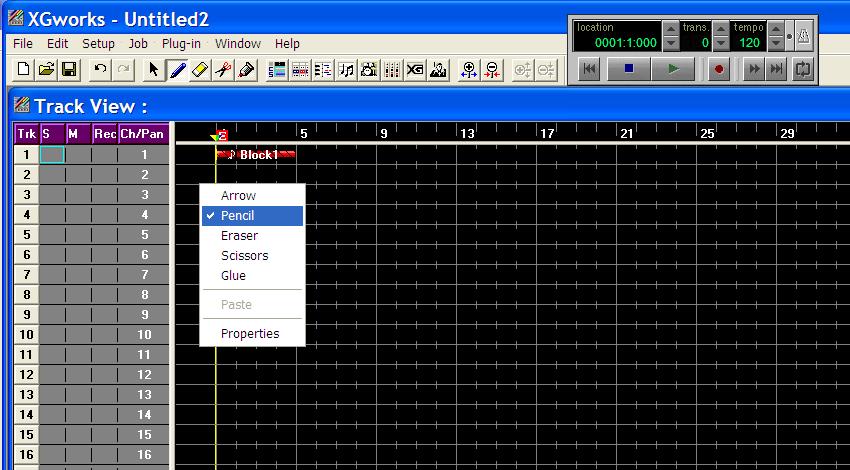
Now draw, left to right, starting at the left of track one, measure one, a block in which we will place our MIDI notes and other messages. Take a look above and you'll see it, in red, already labelled by XGworks as "Block1".
One of the slight quirks of this program is that it needs a block created in Track View, in each track we intend to use, before we can enter notes and other MIDI data into it. This technique for creating blocks works the same for both versions of XGworks.
Before actually creating any more let's take a look at the XGworks Window. At the top, left, we find the program title together with the file name, if present, otherwise e.g. Untitled1. Immediately below that is the Menu Bar. Directly below that, normally, is the Tool Bar.

The Tool Bar can be moved anywhere convenient by positioning the mouse into a blank area of the bar and dragging to a new position. Notice that it will reorient itself vertically if docked at the extreme left or right hand edges of the window.
Also you should see, somewhere in the window, the Play Control. It too can be dragged anywhere convenient within the window. In XGw4 it will change shape to an elongated set of controls when docked at the top or bottom of the window.
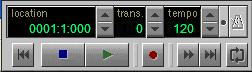
May I strongly suggest that you read pages II-2 to II-6 of the manual (that's from page 39 of the pdf) to acquaint yourself with the functionality of both the Tool Bar and the Play Control. If anything is unclear you can always ask for clarification here, in the forum. A copy of the manual in pdf form is included with the software. You should find it within the Yamaha\XGworks subdirectory within Program Files on your C:\ drive.
Track View and Sequence Name
Moving on to the Track View itself we will find the title "Track View :" and, if entered, the name of the sequence. Let's enter a new sequence name for this file.
To do this we will need to open up the Master Track window. That's the last icon of the block of eight, to the right of the XG icon. I think it's meant to be the head and shoulders of a conductor. The contents of this window look remarkably like the List View but is dedicated to what is known as Meta Data. Meta Data is information about the contents of the MIDI file and some control data for its playback, e.g. tempo.
Meta Data is primarily information for the sequencing/playback software or hardware and isn't sent across the MIDI interface. So the majority of it will be at the very start of the file. That's Measure one, Beat one, Tick (MBT) zero or 001:01:000. Look at the columns labelled L1, L2 and L3, they show us the position of the data within the file.
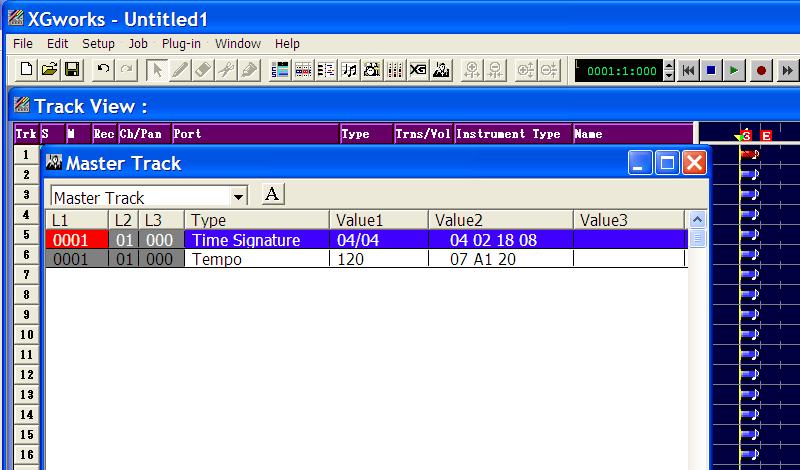
N.B. Within a file created by, or saved in XGw there are always 480 sub-divisions of a quarter note, numbered 0 to 479.
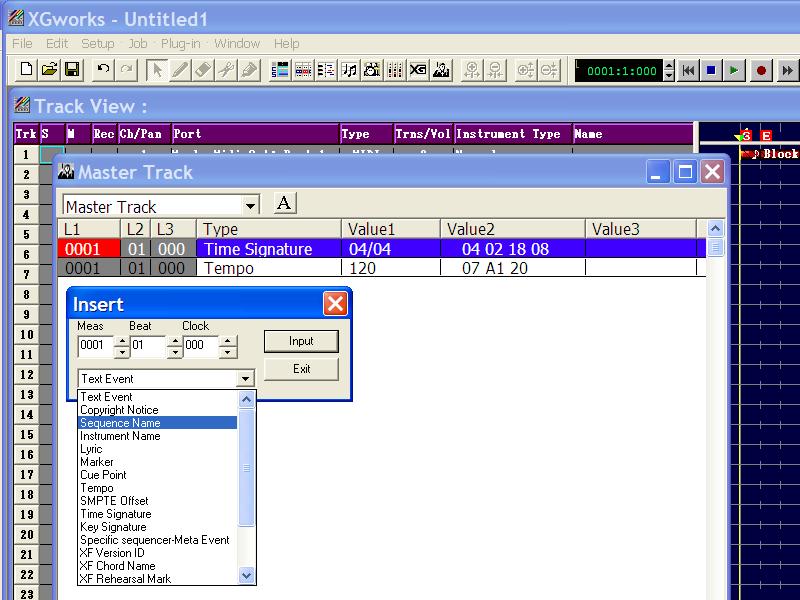
Right click in the Master Track window and a pop up menu will appear, in XGw4 select "Insert Event" then "Meta Event", in XGw3 just select "Meta Event". In the pop up box, leave the MBT at 1:1:000 and change the "Text Event" to Sequence Name.
Click in the Sequence Name field "Value 1" and type in "Mr.Tambourine Man - Bass Gliss" then "Enter". You should see the Track View title change. Now save the file to a convenient directory, in this case as an XGworks (XWS) file. We'll save it as a MIDI file, if we want to, later. I called my file "MrTM-BassGliss.XWS" in a directory (folder) called Tutorial.
Getting Organised
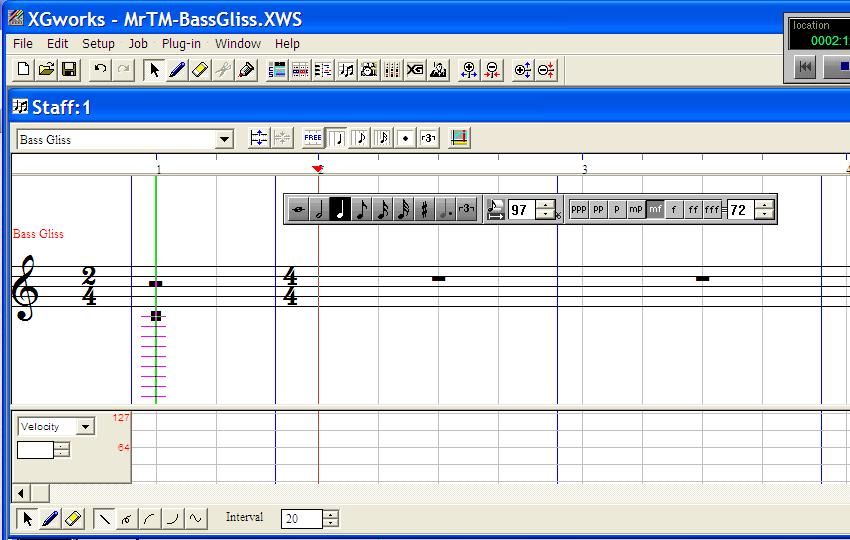
When we create a new MIDI file it's always a good idea, and recommended practice to create one whole measure to contain set up information. However, it's rarely the case that we need a whole 4/4 measure to contain this information. Usually a measure of 2/4 is quite sufficient. So lets create that structure now.
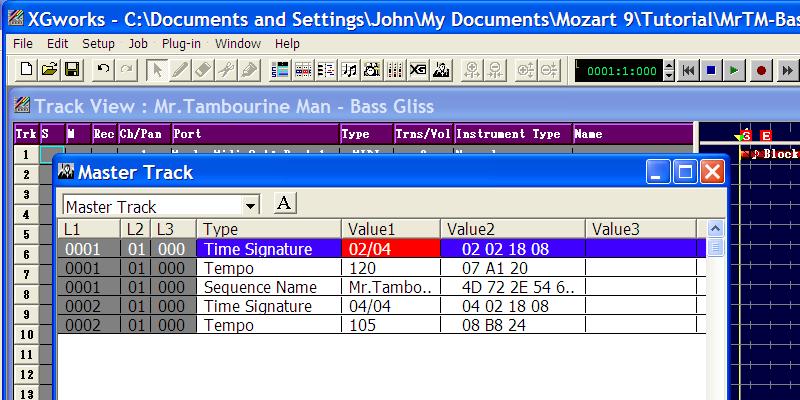
Open the Master Track again and alter the Time Signature to 2/4 (click in the Value 1 field, it turns red) then simply type "2" then "/" then "4" (no quotes) then Enter.
Now, using the same Insert Event technique insert at "0002:01:000" another Time Signature event followed by a Tempo event. You can alter the value of the Tempo event to something slower by altering Value 1 of this event. It should look like this if you've done it correctly:
Track Parameters
Within the Track View, on the left, are track parameters and on the right the tracks themselves, separated by a vertical line known as the Split Bar. This bar can be dragged to the right or left opening up one or the other section as needed. Typically we need to see and modify the track parameters at start up then the tracks during MIDI sequence programming.
To understand the functions within the Track View can I suggest that you read pages III-1 to III-9 of the manual, starting at page 45 of the PDF. Otherwise it'll take me pages to describe the functions. If you need clarification please ask. Then we'll get to use what you've learned right here.
In my use of XGworks there are three columns which I tend to use quite frequently, Solo, Mute and Record, in that order. So I have moved those columns to the left hand side. The other columns are part of the initial set up, so they can be in whatever order suits you. All columns, apart from the track number "Trk", can be slid left or right by dragging the column heading (the mouse pointer changes to <==> ). Column widths can be changed by dragging the lines between the column headings (the mouse pointer changes to <=||=> ).
Let's enter a name for the track by clicking in the Name field for Track 1 (channel 1). As we're going to be using the General MIDI (GM) voice Finger Bass for the sound, that's what I'm going to call the track that.
Make sure the Port field is set to point at the connection your MIDI sound card (or whatever) is connected to.
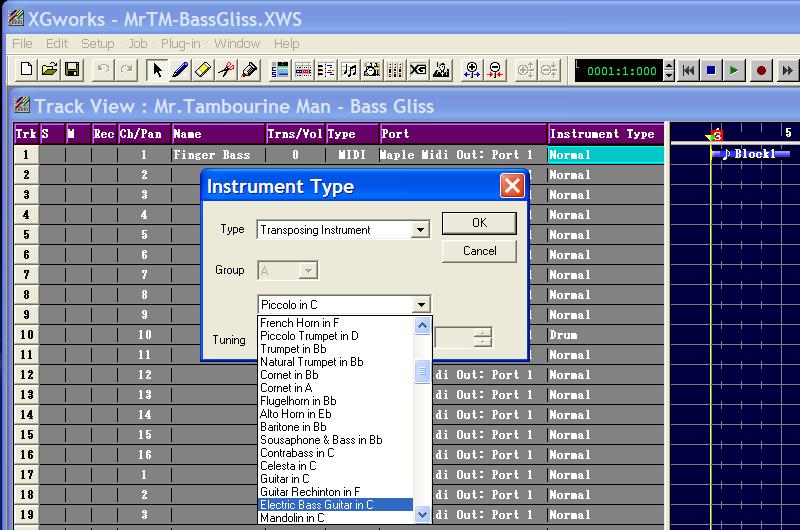
Lastly, as we are about to program a bass guitar, we will define the "Instrument Type" as Bass Guitar. Why do this and what does the setting do? If we use notation (Staff View) to enter notes, it is most useful if we see the notation in the same way that the instrument player would see it. A bass guitar is played an octave below what is written on the musical stave. By defining the Instrument Type as a Transposing Instrument, Bass Guitar, XGworks automatically transposes what we hear down an octave from what we write on the stave. Click, where it says "Normal" in the Instrument Type field of track 1 and fill in the fields as shown below:
One last thing. If it's not already red click once on "Block1" in the track view, it will turn red. Wait a moment then click again on it. A little text box should open into which we can name the block what we want. I'm going to enter "Bass Gliss" as that's what we'll be putting in, in terms of MIDI data. It's not necessary, but it can help identify what data we're working on if we were working on several tracks simultaneously.
Having completed that step we have now concluded the Meta Data set up for the file itself and for that particular track. To summarise, we have entered a file name and a sequence name, created a short measure at the start to hold MIDI set up data, and entered an initial tempo value for the file. We have also prepared the track to point to our sound card, entered an instrument name and prepared it for the input of bass guitar notes.
You could, if you want, slide the vertical Split Bar most of the way over to the left hand side. Mine is now just showing the three columns Solo, Mute and Record as well as the track number.
Track set up stuff!
Now, with the Bass Gliss track highlighted, right click on it and select List View from the menu, or click on the List View icon in the Tool Bar. It's empty, let's put something in it.
For a start it's a good idea to put what's called a "GM System On" or "GM Reset" message at the beginning of any MIDI file, unless we are making a file for some synthesiser and we don't want to alter any detailed programming we may have already created. The reason is that it tells our sound module to reset all internal settings back to their default values. For example, if there had been a fade out in a previously played MIDI file then all channel volumes will have ended up being down at zero. If our file doesn't put them back up again then the result could be silence when we play our file.
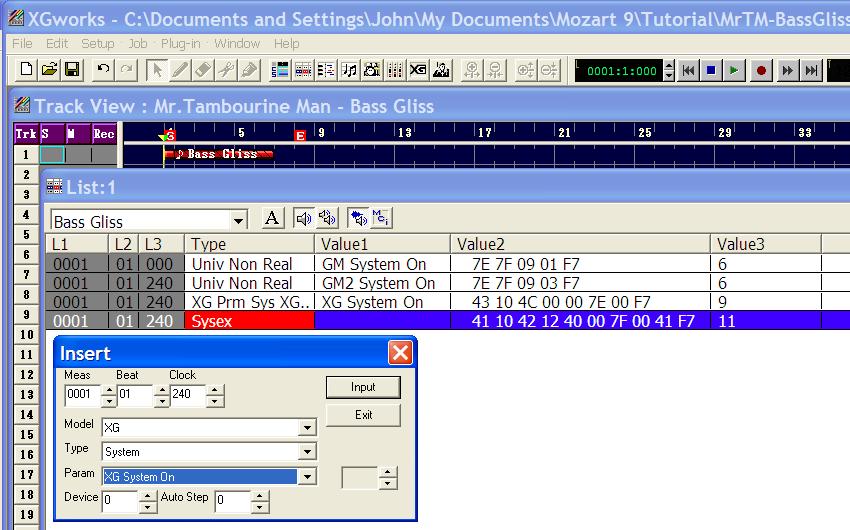
To insert this message, and all of the others coming up, we will right click in the List View window and use Insert Event / System Exclusive. Leave the MBT at 1:1:000 and select, in Model "GM", then in Param select "GM System On" then Input.
Don't Exit yet because it's likely that we'll want to enter a second event of this type. Set the Clock field to "240", we need to let a bit of time go by before the next message is issued, as it takes a fraction of a second for a hardware sound module to obey the GM On message. Setting the clock field to 240 makes sure the next message is not issued for about 1/4 of a second.
Now, what kind of sound module are you using?
If you are using a GM2 compatible module we will need to insert a GM2 On message.
If you are using a Yamaha XG sound module we need to insert an XG on message.
If you are using a Roland SC sound module we need to insert a GS on message.
We'll do the last one by putting in an XG On message and then altering it, as XGworks doesn't know anything about Roland SysEx messages.
So, with our MBT pointing at 1:1:240 do one of the following:
For a GM2 On message select Model "GM" then Param "GM2 System On", Insert and Exit.
For an XG On message select Model "XG", Param "XG System On" and do the same for a Roland GS On message.
Now, for a Roland we will need to alter the entry in the Value 2 column.
Click in Value 2 and then click again. The entry will change from red to highlighted text.
Using the arrow keys move all the way to the left change the 43 to 41 and, going right, change the 4C to 42, now enter 12 with a space either side, change the first 00 to 40, change the 7E to 7F, then before the final F7, enter 41 with spaces.
It should read "41 10 42 12 40 00 7F 00 41 F7" with a single space between each pair of digits.
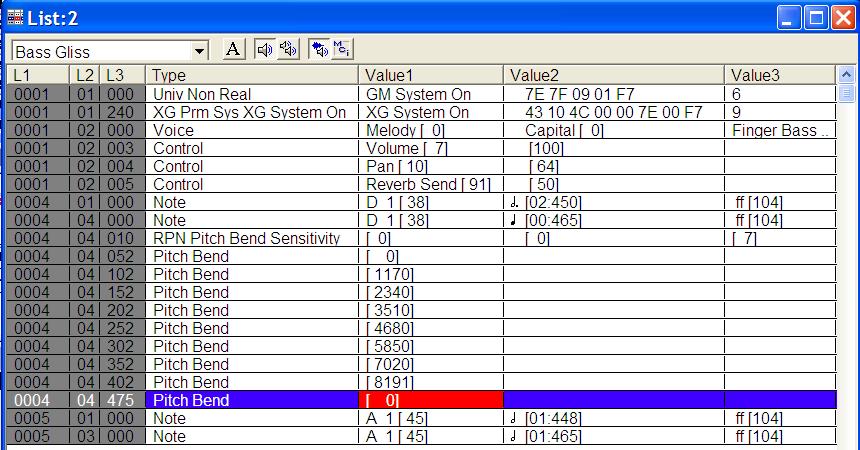
Here's a picture of ALL of the messages entered.
Remember you only want the first and ONE of the three messages.
We now need to select what sound will be played, and we want a Finger Bass.
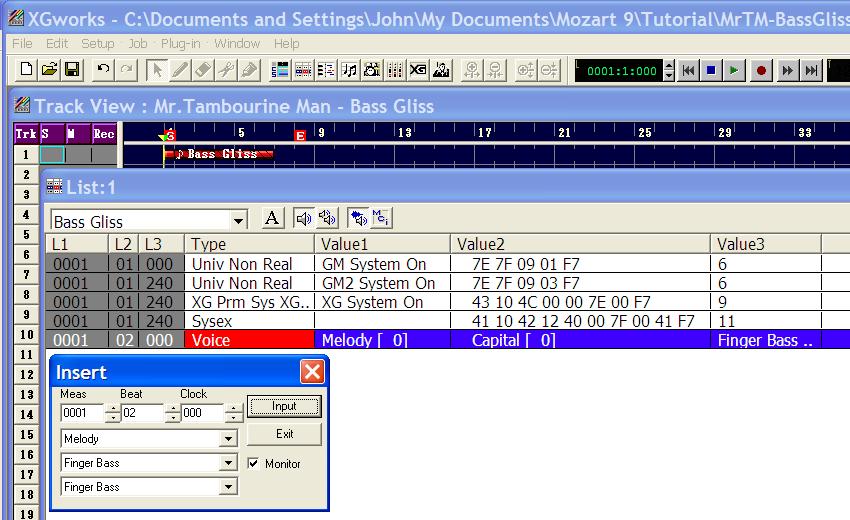
So, Insert Event / Packed Voice ... change MBT to 1:2:000
In the second field change Grand Piano to Finger Bass. If you're using and XG tone generator you can further choose from the various types of finger bass available in field three. If you aren't using XG leave them well alone. Then Exit.
This should be the result when the Insert Packed Voice has been Input.
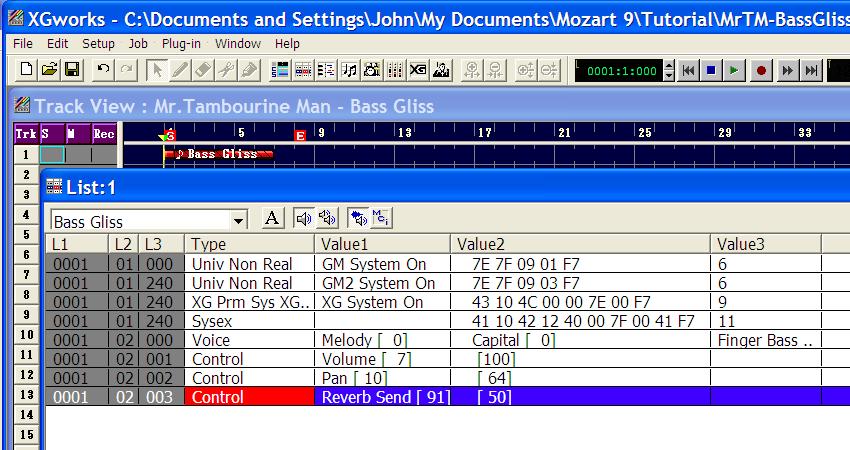
Now I'd like you to try to insert three Control Events at MBT 1:2:001, :002 and :003 respectively. The events are Volume with a value of 100, Pan with a value of 64 and Reverb with a value of 50. Try discovering what the Auto Step with a value of 1 does.
It should all look like this when we've finished:
Now save the file.
This may all seem a little long winded, but when we've become used to it, it just takes a couple of minutes to set up the file and a few moments to enter the Voice parameters for each track. We only need to enter the System On messages once in a file and it's normal to put them in track one MIDI channel one.
That's the end of the set up part of the tutorial, next we'll be tackling the more interesting task of note and pitch bend entry.
Hope you enjoy it so far.
Copyright © 2013, John L Garside.
A tutorial for XGworks beginners.
In this lesson I'm going to attempt to show you how to create a very simple MIDI file, from scratch, literally step by step using the XGworks sequencing program, using some clever inbuilt features.
The lesson will be divided into two sections, the first taking a fairly close look at all the things that are suggested should be done in initial file set up, the second looking at the entry of musical notes and then modifying the file to incorporate other MIDI messages, in this case specifically "pitch bend".
In this lesson we will only make use of the computer keyboard and the mouse, as far as note input is concerned. Naturally you will need to have your computer connected up to a suitable sound creation source; a sound card or module, or some kind of virtual instrument, if you want to hear our creation.
The lesson applies to both XGworks version 3 (XGw3) and the English version 4 of XGworks (XGw4) , and I'll try to make clear some of the slight differences between the features as they are implemented in both versions.
The tutorial was provoked (inspired?) by a question asked by a very experienced sequencer of good quality MIDI files, Wayne (Reed) Knazek, in the MidKar forum over in Yahoo Groups. tech.groups.yahoo.com/group/midkar/message/30496. Wayne wasn't sure how to sequence the opening bass notes for the Byrds version of Mr Tambourine man. Or, rather, specifically the slide from D to A in measures 3 and 4 of the song (repeated in the fade out at the end). Try here: www.youtube.com/watch?v=06rGW0AQGiY
This tutorial will just cover those opening, half dozen or so, bass notes and the pitch bend, but with many XGworks set up and sequencing lessons learned on the way.
Starting Out.
Start up XGworks and make sure you have done the System Setup as outlined in my previous tutorial on this subject. If you're using XGw4 then it will have created a new file with blank "blocks" in measure one, in all of the first sixteen tracks from channels one to sixteen (does that make sense?). Anyway, like this:
It will also automatically open a List View window initially, which you can close.
We only need track one for this tutorial so, if you like, you can delete the blank blocks in tracks 2 to 16 by highlighting them with the mouse, then pressing the "Delete" key on the keyboard.
For those working with XGw3 we will need to create a blank block in track 1. We do this by picking up the "Pencil Tool" and drawing in the block. The Pencil Tool can be found on the Tool Bar at the top, next to the Arrow Tool. Alternately and more easily, right click anywhere within the Track View and select the Pencil from the pop-up menu. See below:
Now draw, left to right, starting at the left of track one, measure one, a block in which we will place our MIDI notes and other messages. Take a look above and you'll see it, in red, already labelled by XGworks as "Block1".
One of the slight quirks of this program is that it needs a block created in Track View, in each track we intend to use, before we can enter notes and other MIDI data into it. This technique for creating blocks works the same for both versions of XGworks.
Before actually creating any more let's take a look at the XGworks Window. At the top, left, we find the program title together with the file name, if present, otherwise e.g. Untitled1. Immediately below that is the Menu Bar. Directly below that, normally, is the Tool Bar.
The Tool Bar can be moved anywhere convenient by positioning the mouse into a blank area of the bar and dragging to a new position. Notice that it will reorient itself vertically if docked at the extreme left or right hand edges of the window.
Also you should see, somewhere in the window, the Play Control. It too can be dragged anywhere convenient within the window. In XGw4 it will change shape to an elongated set of controls when docked at the top or bottom of the window.
May I strongly suggest that you read pages II-2 to II-6 of the manual (that's from page 39 of the pdf) to acquaint yourself with the functionality of both the Tool Bar and the Play Control. If anything is unclear you can always ask for clarification here, in the forum. A copy of the manual in pdf form is included with the software. You should find it within the Yamaha\XGworks subdirectory within Program Files on your C:\ drive.
Track View and Sequence Name
Moving on to the Track View itself we will find the title "Track View :" and, if entered, the name of the sequence. Let's enter a new sequence name for this file.
To do this we will need to open up the Master Track window. That's the last icon of the block of eight, to the right of the XG icon. I think it's meant to be the head and shoulders of a conductor. The contents of this window look remarkably like the List View but is dedicated to what is known as Meta Data. Meta Data is information about the contents of the MIDI file and some control data for its playback, e.g. tempo.
Meta Data is primarily information for the sequencing/playback software or hardware and isn't sent across the MIDI interface. So the majority of it will be at the very start of the file. That's Measure one, Beat one, Tick (MBT) zero or 001:01:000. Look at the columns labelled L1, L2 and L3, they show us the position of the data within the file.
N.B. Within a file created by, or saved in XGw there are always 480 sub-divisions of a quarter note, numbered 0 to 479.
Right click in the Master Track window and a pop up menu will appear, in XGw4 select "Insert Event" then "Meta Event", in XGw3 just select "Meta Event". In the pop up box, leave the MBT at 1:1:000 and change the "Text Event" to Sequence Name.
Click in the Sequence Name field "Value 1" and type in "Mr.Tambourine Man - Bass Gliss" then "Enter". You should see the Track View title change. Now save the file to a convenient directory, in this case as an XGworks (XWS) file. We'll save it as a MIDI file, if we want to, later. I called my file "MrTM-BassGliss.XWS" in a directory (folder) called Tutorial.
Getting Organised
When we create a new MIDI file it's always a good idea, and recommended practice to create one whole measure to contain set up information. However, it's rarely the case that we need a whole 4/4 measure to contain this information. Usually a measure of 2/4 is quite sufficient. So lets create that structure now.
Open the Master Track again and alter the Time Signature to 2/4 (click in the Value 1 field, it turns red) then simply type "2" then "/" then "4" (no quotes) then Enter.
Now, using the same Insert Event technique insert at "0002:01:000" another Time Signature event followed by a Tempo event. You can alter the value of the Tempo event to something slower by altering Value 1 of this event. It should look like this if you've done it correctly:
Track Parameters
Within the Track View, on the left, are track parameters and on the right the tracks themselves, separated by a vertical line known as the Split Bar. This bar can be dragged to the right or left opening up one or the other section as needed. Typically we need to see and modify the track parameters at start up then the tracks during MIDI sequence programming.
To understand the functions within the Track View can I suggest that you read pages III-1 to III-9 of the manual, starting at page 45 of the PDF. Otherwise it'll take me pages to describe the functions. If you need clarification please ask. Then we'll get to use what you've learned right here.
In my use of XGworks there are three columns which I tend to use quite frequently, Solo, Mute and Record, in that order. So I have moved those columns to the left hand side. The other columns are part of the initial set up, so they can be in whatever order suits you. All columns, apart from the track number "Trk", can be slid left or right by dragging the column heading (the mouse pointer changes to <==> ). Column widths can be changed by dragging the lines between the column headings (the mouse pointer changes to <=||=> ).
Let's enter a name for the track by clicking in the Name field for Track 1 (channel 1). As we're going to be using the General MIDI (GM) voice Finger Bass for the sound, that's what I'm going to call the track that.
Make sure the Port field is set to point at the connection your MIDI sound card (or whatever) is connected to.
Lastly, as we are about to program a bass guitar, we will define the "Instrument Type" as Bass Guitar. Why do this and what does the setting do? If we use notation (Staff View) to enter notes, it is most useful if we see the notation in the same way that the instrument player would see it. A bass guitar is played an octave below what is written on the musical stave. By defining the Instrument Type as a Transposing Instrument, Bass Guitar, XGworks automatically transposes what we hear down an octave from what we write on the stave. Click, where it says "Normal" in the Instrument Type field of track 1 and fill in the fields as shown below:
One last thing. If it's not already red click once on "Block1" in the track view, it will turn red. Wait a moment then click again on it. A little text box should open into which we can name the block what we want. I'm going to enter "Bass Gliss" as that's what we'll be putting in, in terms of MIDI data. It's not necessary, but it can help identify what data we're working on if we were working on several tracks simultaneously.
Having completed that step we have now concluded the Meta Data set up for the file itself and for that particular track. To summarise, we have entered a file name and a sequence name, created a short measure at the start to hold MIDI set up data, and entered an initial tempo value for the file. We have also prepared the track to point to our sound card, entered an instrument name and prepared it for the input of bass guitar notes.
You could, if you want, slide the vertical Split Bar most of the way over to the left hand side. Mine is now just showing the three columns Solo, Mute and Record as well as the track number.
Track set up stuff!
Now, with the Bass Gliss track highlighted, right click on it and select List View from the menu, or click on the List View icon in the Tool Bar. It's empty, let's put something in it.
For a start it's a good idea to put what's called a "GM System On" or "GM Reset" message at the beginning of any MIDI file, unless we are making a file for some synthesiser and we don't want to alter any detailed programming we may have already created. The reason is that it tells our sound module to reset all internal settings back to their default values. For example, if there had been a fade out in a previously played MIDI file then all channel volumes will have ended up being down at zero. If our file doesn't put them back up again then the result could be silence when we play our file.
To insert this message, and all of the others coming up, we will right click in the List View window and use Insert Event / System Exclusive. Leave the MBT at 1:1:000 and select, in Model "GM", then in Param select "GM System On" then Input.
Don't Exit yet because it's likely that we'll want to enter a second event of this type. Set the Clock field to "240", we need to let a bit of time go by before the next message is issued, as it takes a fraction of a second for a hardware sound module to obey the GM On message. Setting the clock field to 240 makes sure the next message is not issued for about 1/4 of a second.
Now, what kind of sound module are you using?
If you are using a GM2 compatible module we will need to insert a GM2 On message.
If you are using a Yamaha XG sound module we need to insert an XG on message.
If you are using a Roland SC sound module we need to insert a GS on message.
We'll do the last one by putting in an XG On message and then altering it, as XGworks doesn't know anything about Roland SysEx messages.
So, with our MBT pointing at 1:1:240 do one of the following:
For a GM2 On message select Model "GM" then Param "GM2 System On", Insert and Exit.
For an XG On message select Model "XG", Param "XG System On" and do the same for a Roland GS On message.
Now, for a Roland we will need to alter the entry in the Value 2 column.
Click in Value 2 and then click again. The entry will change from red to highlighted text.
Using the arrow keys move all the way to the left change the 43 to 41 and, going right, change the 4C to 42, now enter 12 with a space either side, change the first 00 to 40, change the 7E to 7F, then before the final F7, enter 41 with spaces.
It should read "41 10 42 12 40 00 7F 00 41 F7" with a single space between each pair of digits.
Here's a picture of ALL of the messages entered.
Remember you only want the first and ONE of the three messages.
We now need to select what sound will be played, and we want a Finger Bass.
So, Insert Event / Packed Voice ... change MBT to 1:2:000
In the second field change Grand Piano to Finger Bass. If you're using and XG tone generator you can further choose from the various types of finger bass available in field three. If you aren't using XG leave them well alone. Then Exit.
This should be the result when the Insert Packed Voice has been Input.
Now I'd like you to try to insert three Control Events at MBT 1:2:001, :002 and :003 respectively. The events are Volume with a value of 100, Pan with a value of 64 and Reverb with a value of 50. Try discovering what the Auto Step with a value of 1 does.
It should all look like this when we've finished:
Now save the file.
This may all seem a little long winded, but when we've become used to it, it just takes a couple of minutes to set up the file and a few moments to enter the Voice parameters for each track. We only need to enter the System On messages once in a file and it's normal to put them in track one MIDI channel one.
That's the end of the set up part of the tutorial, next we'll be tackling the more interesting task of note and pitch bend entry.
Hope you enjoy it so far.
Copyright © 2013, John L Garside.