

Post by JohnG on Dec 13, 2011 11:45:14 GMT
Inserting a new instrument into an XGworks track.
This is a brief tutorial about how to insert a new "melody" instrument into a MIDI track within XGworks.
It can also be used whenever you wish to select a different "drum kit" from the standard GM one.
In fact, whenever a device uses the "Bank Select", "Program Change" mechanism to change the way sounds in a track are altered (e.g. choosing a different "style" in backing sound module), this procedure should work.
It can be used too when you need to change the allocated "instrument" in an existing GM MIDI file to an XG or GS or other, by replacing the existing selection.
It may be used, as usual, at the beginning of a track, but may also be used to change the initial instrument allocation to another, e.g. from tenor to soprano saxophone, and later back again if necessary, Simply set the Measure, Beat and Tick (M,B,T) to the appropriate position within the track.
The following screen shots show starting from a new file, but an existing MIDI file can be altered in much the same way.
It is strogly recommended, especially if you are a novice user of XGworks, that you read my XGworks setup tutorial held within the files area of the Yahoo group "XGworksusers".
----------------------------------------------------
Start up XGworks in the usual way and it should open with a new file.
Create a new MIDI track either by clicking on the pencil tool from the tool bar or by right clicking in the empty space just before the beginning of the tracks and selecting "Pencil" as shown. Using the pencil, draw a block in any track, Track 1 has been used in the illustration, and the block drawn is four measures long and automatically titled "Block 1".
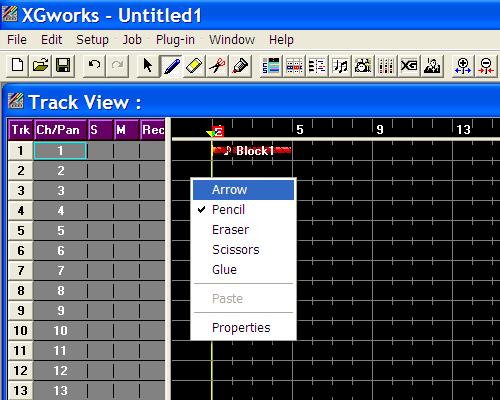
The block will usually be highlighted in red, as shown.
Now change back to the "Arrow" tool, whilst leaving Block 1 highlighted.
Then, either right click on the highlighted block as shown below and select "List", or select "Window" then "List" from the menu bar, or click on the "List" tool from the toolbar. Running the mouse over the toolbar will display "Open List Window" as a pop-up in this case.

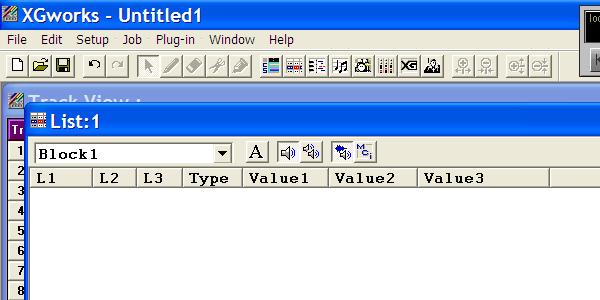
Opening the List Window should, in the case of a new file, bring up an empty list as shown below. The various columns have been deliberately made narrow in this case. Their width can be altered by hovering the cursor over a vertical line separating the column titles when it will change to something like this <-|->. Click and drag to change the width.
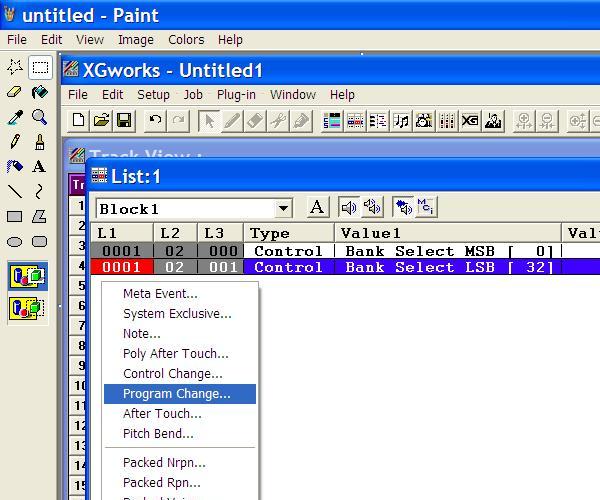
The way that a voice is changed is by issuing two Bank Select messages followed by a Program Change message. The Bank Select messages are known as "Control Change" messages, so, now right click within the empty space and a drop down menu should appear as below.
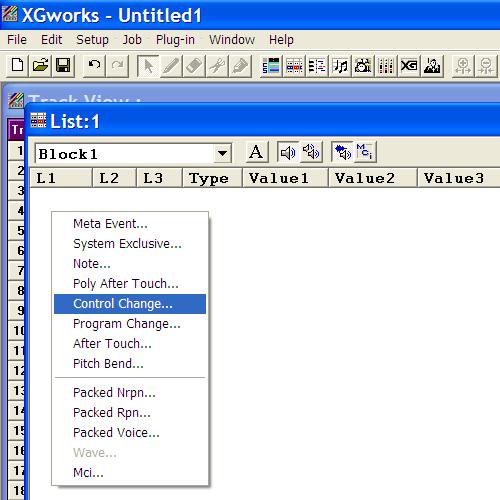
Select the "Control Change..." item from the menu and you should see something like the following.
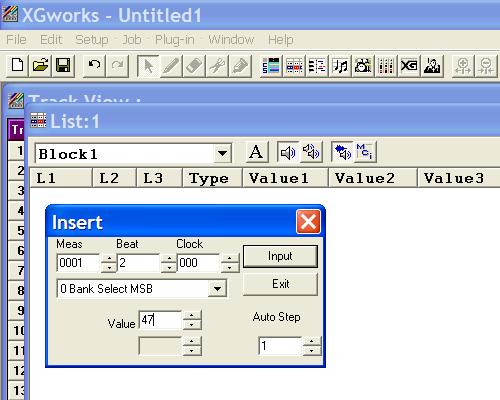
You will see, though, that I have elected to put this message at Beat 2 of Measure 1.
"0 Bank Select MSB" will come up automatically as the first controller that can be entered.
At the bottom right I have elected for "Auto Step" to be 1. This means that the next message will go in at clock tick 001.
The value of 47 has been taken, as an example, from page 91 of the User Manual for for Roland BK-7m backing module. the first of the three main columns (piano), and the second item "SuperiorPian".
The values for CC00, CC32 and PC are given as 47,4, 0. Here we are entering CC00 which is 47.
Having made the changes press "Input" and we should see the following.

Note the line that has been entered 0001.02.000, Control, Bank Select MSB [0], [47).
Note too that the Clock value has incremented to 001.
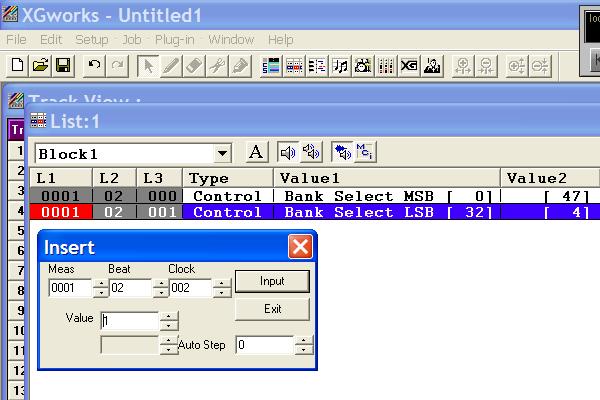
I have entered the next set of values by scrolling down to select "32 Bank Select LSB", and changed the Value to 4 for CC32 from the BK-7m list we referred to just above. When you've made the changes press "Input" (you should see a new line in the List with the appropriate entries) and then "Exit".
Now we need to insert the Program Change message.
Right click in the empty space again and select "Program Change" from the drop down menu as shown.
You should then see the following.
We want the Program Change to go in after the two Bank Select messages so the Clock has been moved forward one tick to 2. In the BK-7m list it shows PC as being 0. But in the normal and recommended way of numbering instruments is to start from 1 not from 0. e.g. 1 to 128 not 0 to 127. XGworks works in this way.
So when we see a zero in a instrument's MIDI voice listing starting at zero, we must ADD 1 TO THE PC OF EVERY INSTRUMENT IN THE TABLE.
In this case the 0 in the table becomes 1 in the XGworks value. Having made the changes we can Input and then Exit.
We should end up with this.
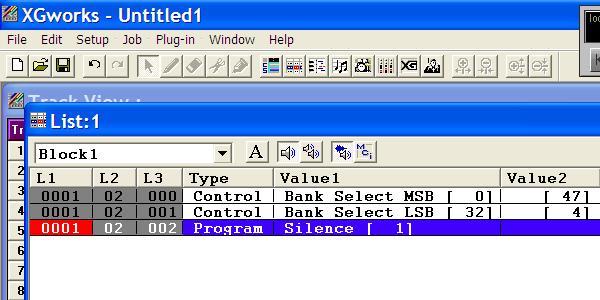
Don't worry about the "Silence" in this case. It simply means that XGworks doesn't recognise this combination of CC00=47, CC32=4, PC=1 as a valid XG value.
And, there we are. We've inserted the three MIDI messages necessary for instrument selection for most modern sound modules.
------------------------------------------------------
However, for those wanting to insert an instrument of a normal XG kind then, apart from using the XGeditor included within XGworks, there are two other mechanisms for doing that. One from within the List View Window, and the other from the Controller section of either the Piano Roll Window or the Staff Window.
These are described below starting first with the List View.
---------------------------------------------------------
Within the List View Window, if we again right click within the empty space, the same pop-up menu will appear, but this time we will choose "Packed Voice..." as shown below.
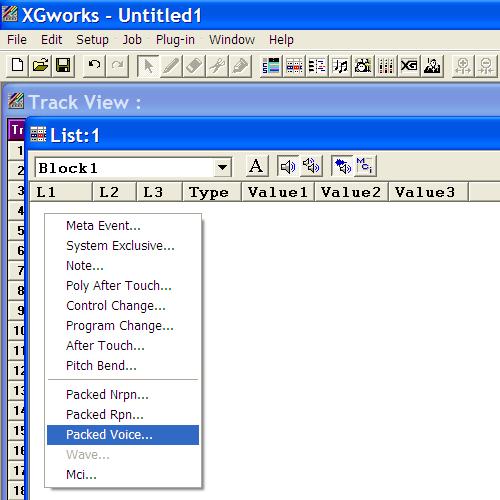
This will open the following pop-up window, where we will first choose the Measure, Beat and Tick (or Clock) where we wish the instrument allocation to occur. The three selections below this allow us to choose the precise instrument we need firstly from Melody or SFX or Drums, next from the range of 128 GM instruments, and finally from the XG subset available to the sound card or module we have set up within XGeditor. We then Input the entry and Exit the Pop-up window.

This procedure will initially set up a single line entry within the List View, as shown. However, when the file is saved as a Standard MIDI File (SMF), either type zero or type one, the three commands, explained previously, will be seen to have been created within the file.
------------------------------------------------
Finally a simpler solution is available which can be used from within either the Piano Roll or the Staff View.
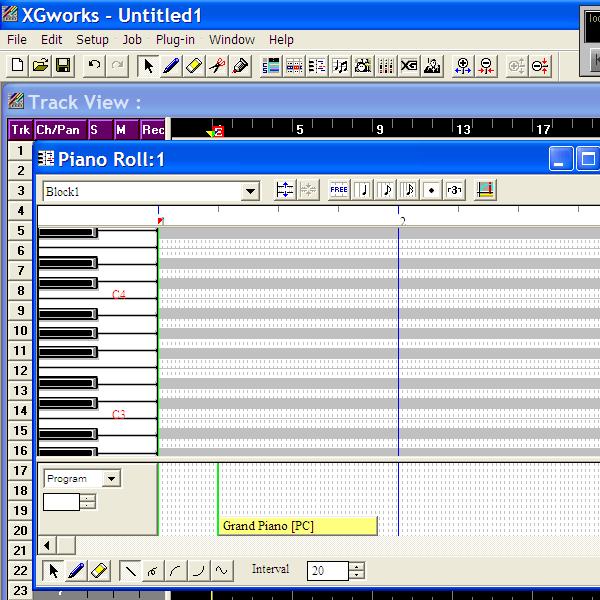
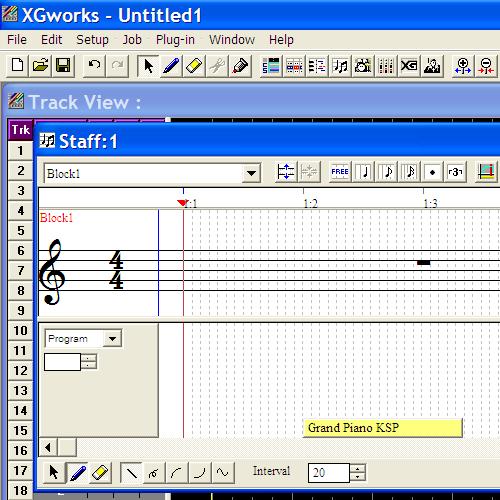
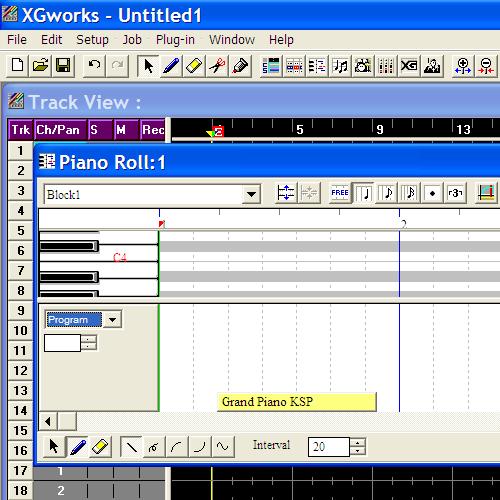
By opening either of these two views then going to the foot of the window, we should see a Controller view. If there is no Controller View visible then move the mouse pointer to the foot of the Piano Roll or Staff View, just above the horizontal scroll bar, where the mouse pointer should change to two small horizontal bars with arrows pointing both up and down. Click and drag the Controller pane open.
Next, change the item in the drop down menu on the left, probably showing "Velocity", to "Program".
Then, by using the pencil tool located at the foot of the controller pane we can either click in the empty controller pane at the point we want our instrument allocation to occur or, if there is already a voice allocation, click on the box and it will change colour, click again and the following instrument selection dialogue will be shown.

Make your selection and click on OK.
You should then have your XG instrument set up, with the three MIDI commands inserted in the correct location within the file. You can always double check it within the List View window for that track.
That concludes the tutorial on voice set up within XGworks.
This is a brief tutorial about how to insert a new "melody" instrument into a MIDI track within XGworks.
It can also be used whenever you wish to select a different "drum kit" from the standard GM one.
In fact, whenever a device uses the "Bank Select", "Program Change" mechanism to change the way sounds in a track are altered (e.g. choosing a different "style" in backing sound module), this procedure should work.
It can be used too when you need to change the allocated "instrument" in an existing GM MIDI file to an XG or GS or other, by replacing the existing selection.
It may be used, as usual, at the beginning of a track, but may also be used to change the initial instrument allocation to another, e.g. from tenor to soprano saxophone, and later back again if necessary, Simply set the Measure, Beat and Tick (M,B,T) to the appropriate position within the track.
The following screen shots show starting from a new file, but an existing MIDI file can be altered in much the same way.
It is strogly recommended, especially if you are a novice user of XGworks, that you read my XGworks setup tutorial held within the files area of the Yahoo group "XGworksusers".
----------------------------------------------------
Start up XGworks in the usual way and it should open with a new file.
Create a new MIDI track either by clicking on the pencil tool from the tool bar or by right clicking in the empty space just before the beginning of the tracks and selecting "Pencil" as shown. Using the pencil, draw a block in any track, Track 1 has been used in the illustration, and the block drawn is four measures long and automatically titled "Block 1".
The block will usually be highlighted in red, as shown.
Now change back to the "Arrow" tool, whilst leaving Block 1 highlighted.
Then, either right click on the highlighted block as shown below and select "List", or select "Window" then "List" from the menu bar, or click on the "List" tool from the toolbar. Running the mouse over the toolbar will display "Open List Window" as a pop-up in this case.
Opening the List Window should, in the case of a new file, bring up an empty list as shown below. The various columns have been deliberately made narrow in this case. Their width can be altered by hovering the cursor over a vertical line separating the column titles when it will change to something like this <-|->. Click and drag to change the width.
The way that a voice is changed is by issuing two Bank Select messages followed by a Program Change message. The Bank Select messages are known as "Control Change" messages, so, now right click within the empty space and a drop down menu should appear as below.
Select the "Control Change..." item from the menu and you should see something like the following.
You will see, though, that I have elected to put this message at Beat 2 of Measure 1.
"0 Bank Select MSB" will come up automatically as the first controller that can be entered.
At the bottom right I have elected for "Auto Step" to be 1. This means that the next message will go in at clock tick 001.
The value of 47 has been taken, as an example, from page 91 of the User Manual for for Roland BK-7m backing module. the first of the three main columns (piano), and the second item "SuperiorPian".
The values for CC00, CC32 and PC are given as 47,4, 0. Here we are entering CC00 which is 47.
Having made the changes press "Input" and we should see the following.
Note the line that has been entered 0001.02.000, Control, Bank Select MSB [0], [47).
Note too that the Clock value has incremented to 001.
I have entered the next set of values by scrolling down to select "32 Bank Select LSB", and changed the Value to 4 for CC32 from the BK-7m list we referred to just above. When you've made the changes press "Input" (you should see a new line in the List with the appropriate entries) and then "Exit".
Now we need to insert the Program Change message.
Right click in the empty space again and select "Program Change" from the drop down menu as shown.
You should then see the following.
We want the Program Change to go in after the two Bank Select messages so the Clock has been moved forward one tick to 2. In the BK-7m list it shows PC as being 0. But in the normal and recommended way of numbering instruments is to start from 1 not from 0. e.g. 1 to 128 not 0 to 127. XGworks works in this way.
So when we see a zero in a instrument's MIDI voice listing starting at zero, we must ADD 1 TO THE PC OF EVERY INSTRUMENT IN THE TABLE.
In this case the 0 in the table becomes 1 in the XGworks value. Having made the changes we can Input and then Exit.
We should end up with this.
Don't worry about the "Silence" in this case. It simply means that XGworks doesn't recognise this combination of CC00=47, CC32=4, PC=1 as a valid XG value.
And, there we are. We've inserted the three MIDI messages necessary for instrument selection for most modern sound modules.
------------------------------------------------------
However, for those wanting to insert an instrument of a normal XG kind then, apart from using the XGeditor included within XGworks, there are two other mechanisms for doing that. One from within the List View Window, and the other from the Controller section of either the Piano Roll Window or the Staff Window.
These are described below starting first with the List View.
---------------------------------------------------------
Within the List View Window, if we again right click within the empty space, the same pop-up menu will appear, but this time we will choose "Packed Voice..." as shown below.
This will open the following pop-up window, where we will first choose the Measure, Beat and Tick (or Clock) where we wish the instrument allocation to occur. The three selections below this allow us to choose the precise instrument we need firstly from Melody or SFX or Drums, next from the range of 128 GM instruments, and finally from the XG subset available to the sound card or module we have set up within XGeditor. We then Input the entry and Exit the Pop-up window.
This procedure will initially set up a single line entry within the List View, as shown. However, when the file is saved as a Standard MIDI File (SMF), either type zero or type one, the three commands, explained previously, will be seen to have been created within the file.
------------------------------------------------
Finally a simpler solution is available which can be used from within either the Piano Roll or the Staff View.
By opening either of these two views then going to the foot of the window, we should see a Controller view. If there is no Controller View visible then move the mouse pointer to the foot of the Piano Roll or Staff View, just above the horizontal scroll bar, where the mouse pointer should change to two small horizontal bars with arrows pointing both up and down. Click and drag the Controller pane open.
Next, change the item in the drop down menu on the left, probably showing "Velocity", to "Program".
Then, by using the pencil tool located at the foot of the controller pane we can either click in the empty controller pane at the point we want our instrument allocation to occur or, if there is already a voice allocation, click on the box and it will change colour, click again and the following instrument selection dialogue will be shown.
Make your selection and click on OK.
You should then have your XG instrument set up, with the three MIDI commands inserted in the correct location within the file. You can always double check it within the List View window for that track.
That concludes the tutorial on voice set up within XGworks.

